Curation
Curation is the first step in creating a meta-analysis, and begins by searching for and importing studies into the project. You will then review those studies for inclusion based on their relevancy to your research question. This involves excluding irrelevant studies, and including relevant ones.
At the end of the process, you will be ready to create a Studyset of related studies that are amenable for neuroimaging meta-analysis
Getting Started
The curation interface uses columns as a way to label studies based on their current status. The left most column is the starting point and all studies imported into the project will begin there. The right most column is the inclusion column and is the place where studies will go to be included in the meta-analysis.
The goal is to get studies from the left most starting column, and narrow them down to a final subset of included studies in the right most column. If a study is not eligible for inclusion at any point, it should be marked as "excluded" before reaching the inclusion column.
The curation step is complete when all studies have been categorized, either by being included or excluded.
When you first begin Curation, you will choose between different workflows, which vary in how rigorous or systematic the selection of studies will be.
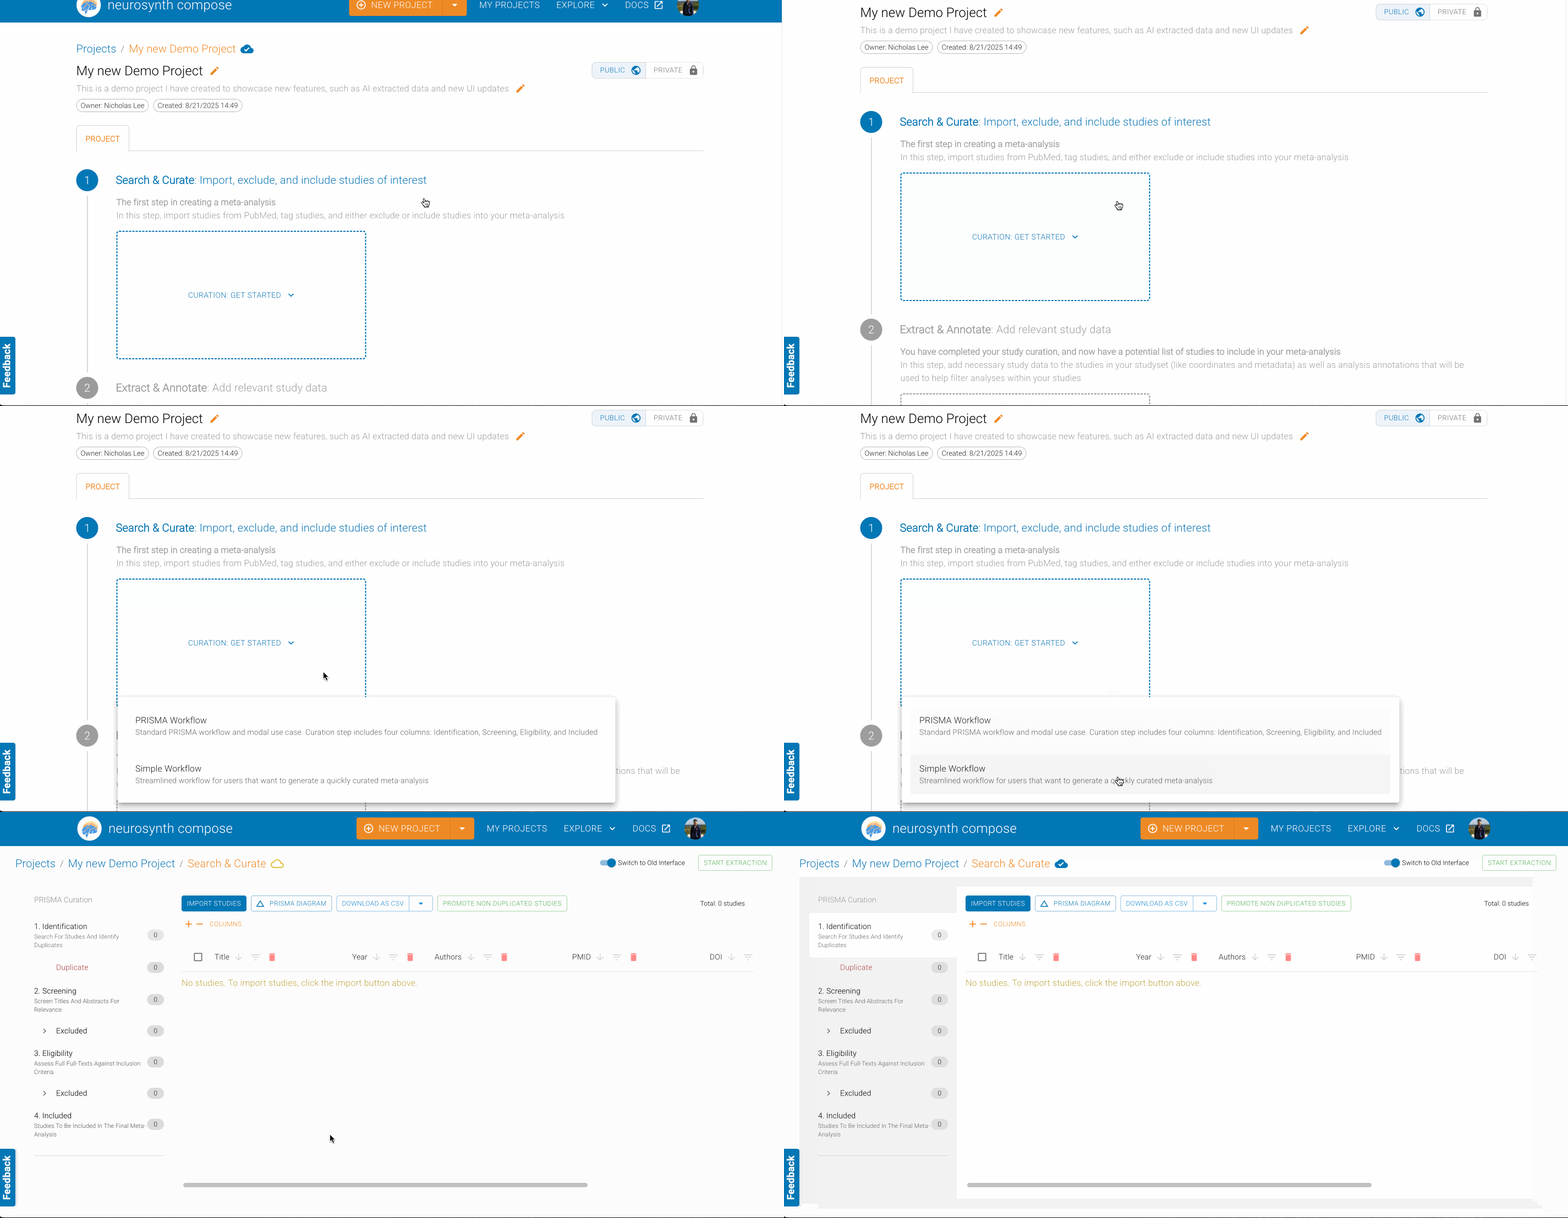
Performing a systematic meta-analysis involves a substantial amount of effort. It is up to you, the researcher, how rigorous to be in this process. We reccomend thinking about your goals prior to starting this process so that you can have clear inclusion guidelines. If you are looking for an exploratory analysis, we reccomend following the tutorial for automated meta-analysis, which replaces manual curation with an automated selection of studies. Note that automated meta-analyses are not a replacement for a careful systematic meta-analysis.
PRISMA Workflow
PRISMA stands for the Preferred Reporting Items for Systematic Review and Meta-Analyses. The PRISMA guidelines are a set of rules for reporting a systematic review, and are the gold standard for producing a proper, rigorous, and transparent meta-analysis.
If you are trying to create a rigorous PRISMA compliant manual meta-analysis you will want to select this option.
When you select this option, neurosynth-compose will automatically initialize the curation step with 4 distinct columns as dictated by PRISMA guidelines: Identification, Screening, Eligibility, Included.
After importing studies into neurosynth, they will be placed into the identification column and studies are triaged from there.
The Identification column is where all imported studies are deposited into initially. As alluded to by the name, the identification column is where you identify all records yielded from your search. In this column, you wil exclude studies purely based on whether they are duplicates of existing studies. All other studies are promoted.
The Screening column consists of all records that have been screened for duplicates. In this column, you want to review the titles/abstracts of studies and exclude purely based on whether they are irrelevant to your research question or domain. All other studies are promoted.
The Eligibility column consists of all records that have been screened for duplicates and irrelevant content. In this column, you want to review the full text of studies and exclude based on whether the study described aligns with the standards of the meta-analysis itself. Reasons for exclusion may include wrong setting, wrong patient population, wrong intervention, wrong paragdigm, etc.
The Included column consists of all records that have passed previous levels of exclusion and can be considered for the next step of the project.
For more information, consult the PRISMA guidelines.
Simple Workflow
If you want to create a semi-automated meta-analysis (i.e. perform manual review on a large-scale study search), you'll want to select this option.
This workflow is initalized with only two columns. As before, the left most column is where studies will be placed when they are imported. However, unlike a full PRISMA workflow, all exclusion occurs in this column. All studies not excluded are then promoted to the right most column for inclusion into the meta-analysis.
Importing
To begin importing studies into your project click the IMPORT STUDIES button.
You will be asked to choose an import method, source, name for your import, and finally address any potential duplicate studies.
We recommend giving each import a meaningful name. This will be useful when you come back and want to know where a certain study was imported from.
Import Method 1: Import from Neurostore
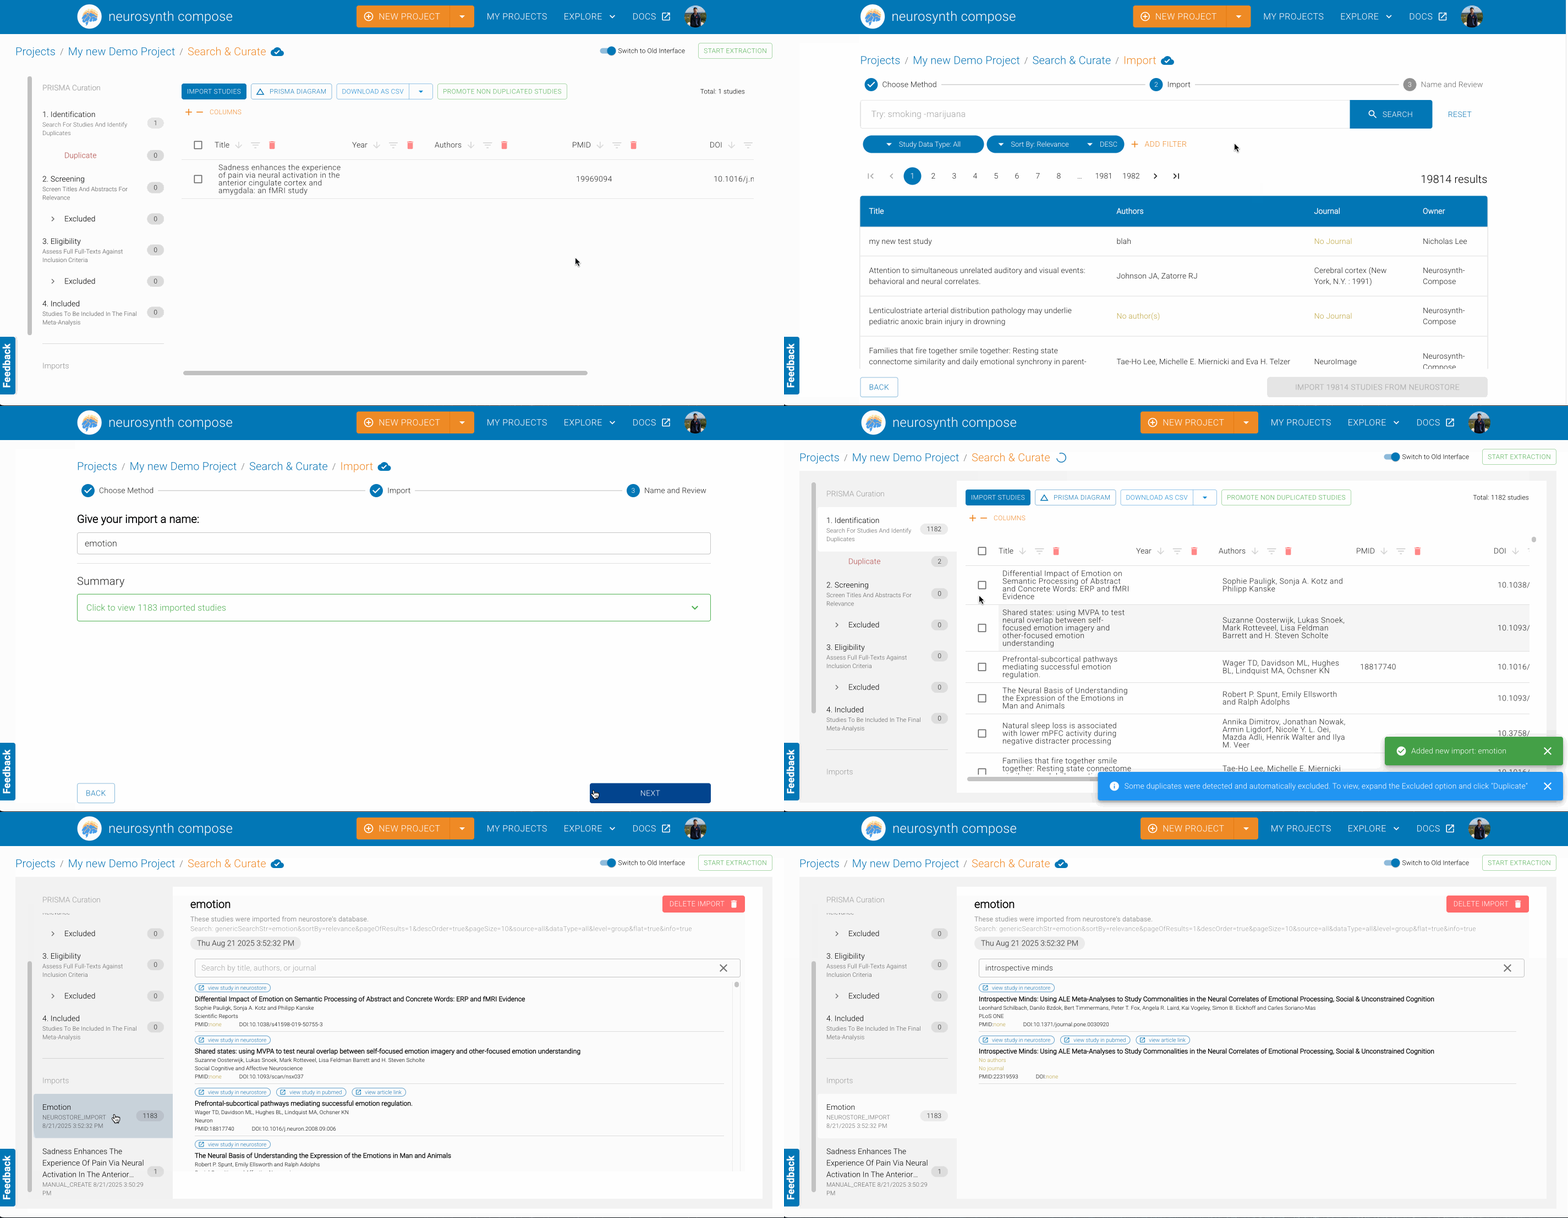
Neurostore indexes a large number of neuroimaging studies which are ready for meta-analysis. Studies in Neurostore have been pre-processed, including extracting peak activation coordinates from Tables in the text, and computing semantic features from the abstract/full text. Neurostore also indexes studies which other users have annotated and made available to others for re-use.
Importing from Neurostore utilizes the Study search UI similar to the Study Page. After entering your search, click the bottom right button to import the searched studies into your project.
Importing from Neurostore can save you a lot of time, as these studies are much more likely to be amenable to meta-analysis, and have pre-extracted coordinates. However, note that some manual annotation may still be required to verify the coordinate extraction, and choose the relevant Analysis (i.e. contrast) for final inclusion.
Import Method 2: Import from PubMed
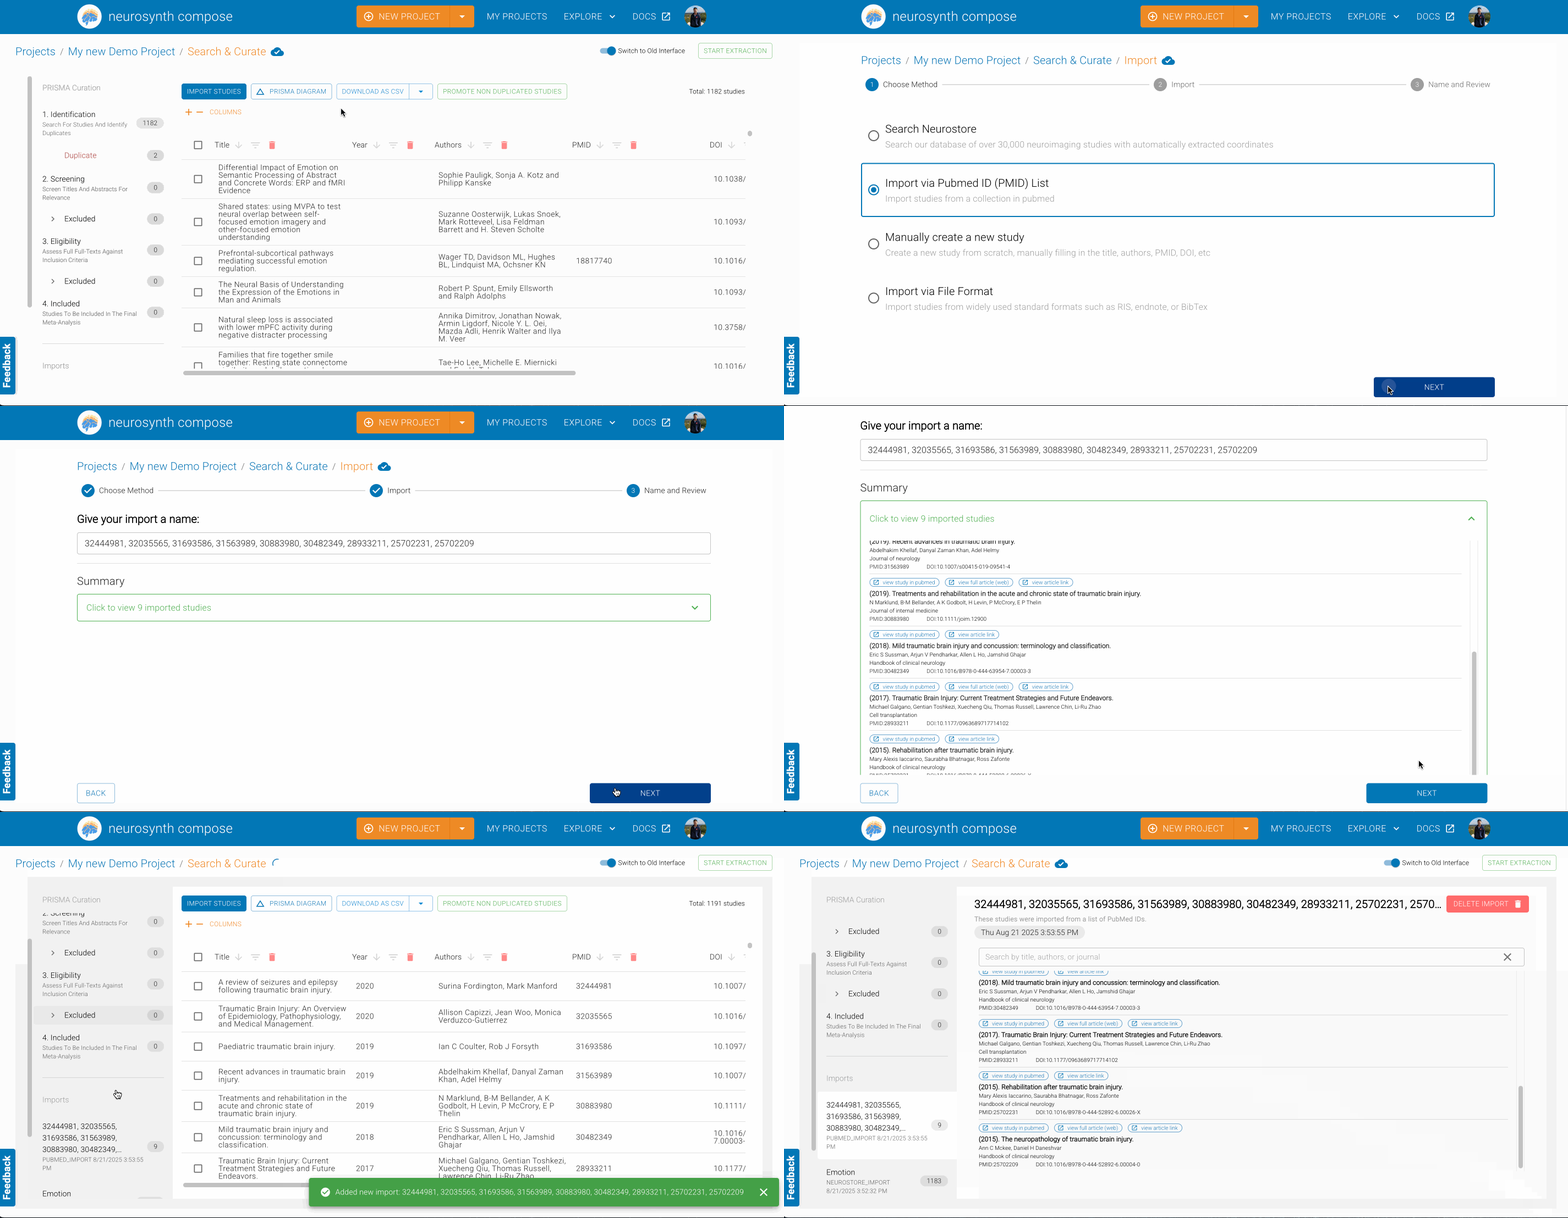
Use this option to import studies directly from PubMed. To start, you need to go to the PubMed Site and either enter in a search or navigate to a previously created collection.
To import the search or collection from PubMed into neurosynth-compose, you will need a text file containing a list of PMIDs. You can obtain this by going to your collection/search and clicking the Save button. Set Selection to All results and set Format to PMID. Click Create file and your text file containing the PMIDs will be generated and downloaded.
Neurosynth-Compose uses the PubMed API to import studies. As a result, the maximum number of PMIDs that can be imported at once is 1,500. If your collection has more than 1,500 PMIDs, split the import into multiple files. You can select the same import name so that they are all grouped together.
Import Method 3: Import from BibTex/RIS/endnote
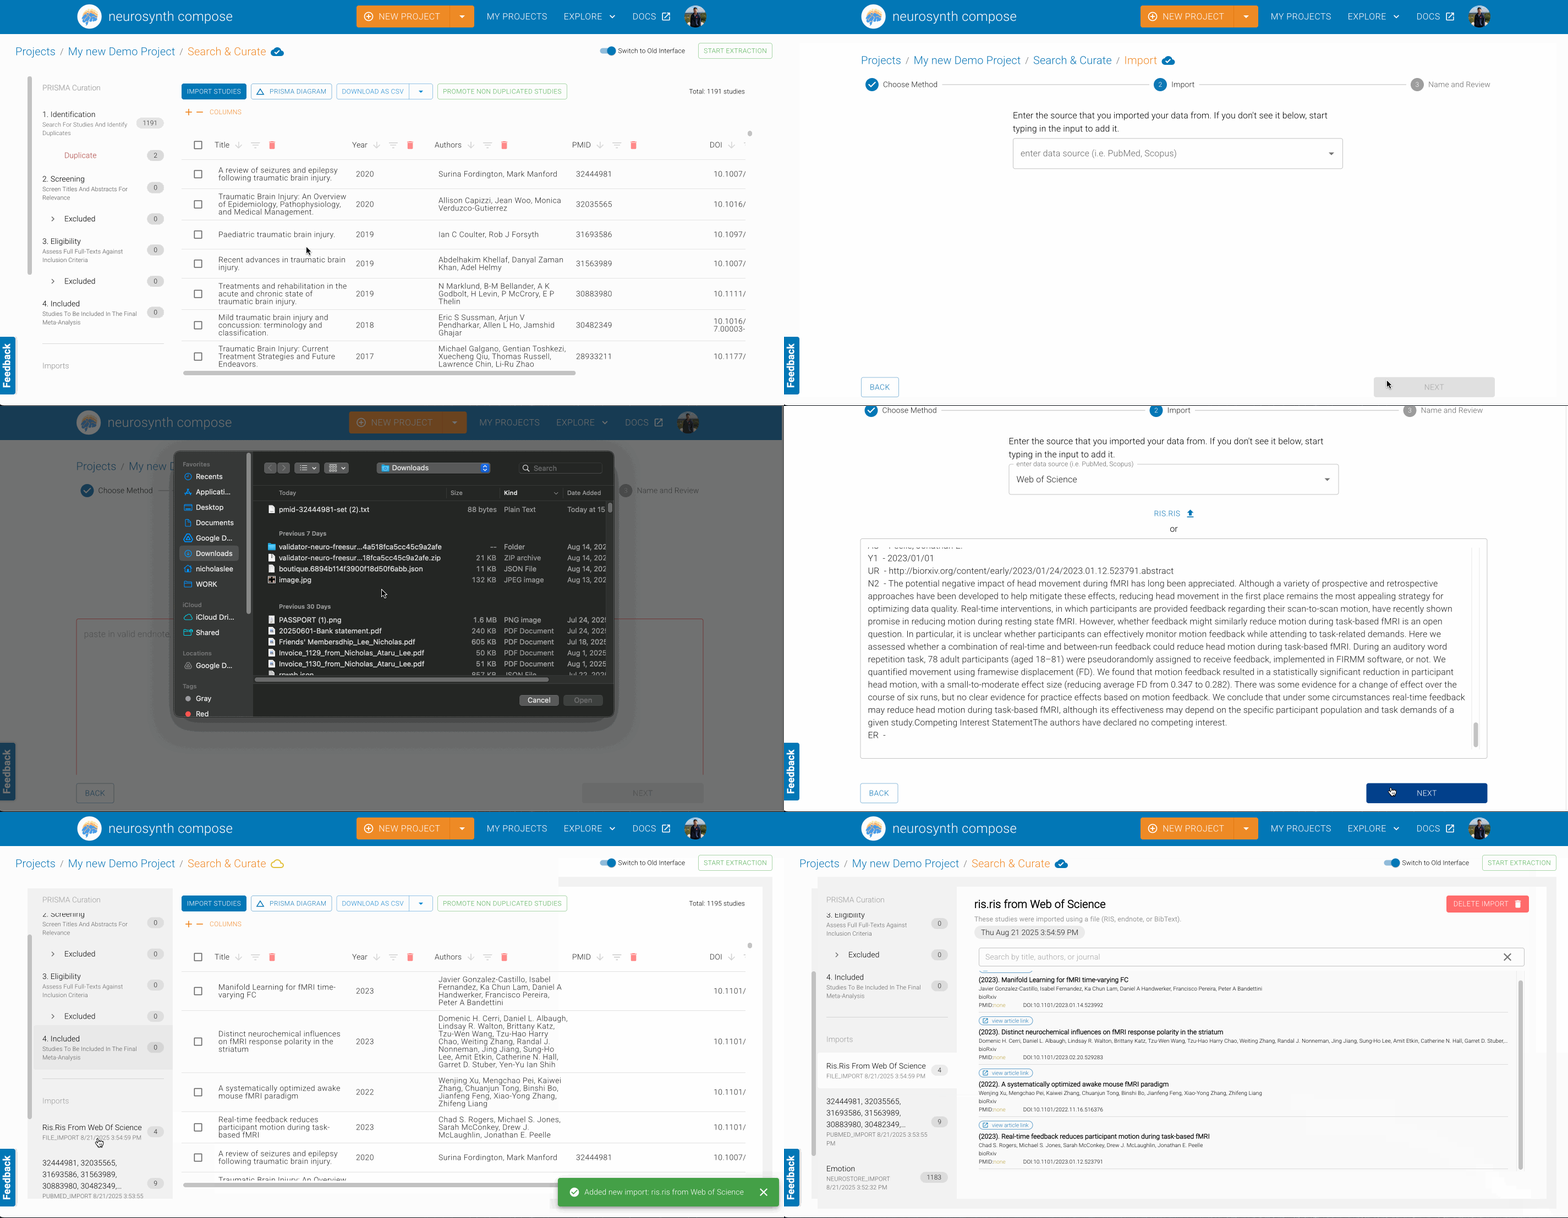
Use this option to import studies via a .bib, .RIS, or .enw file. This may be useful if you want to import from a citation manager like Zotero.
Import Method 4: Custom Studies
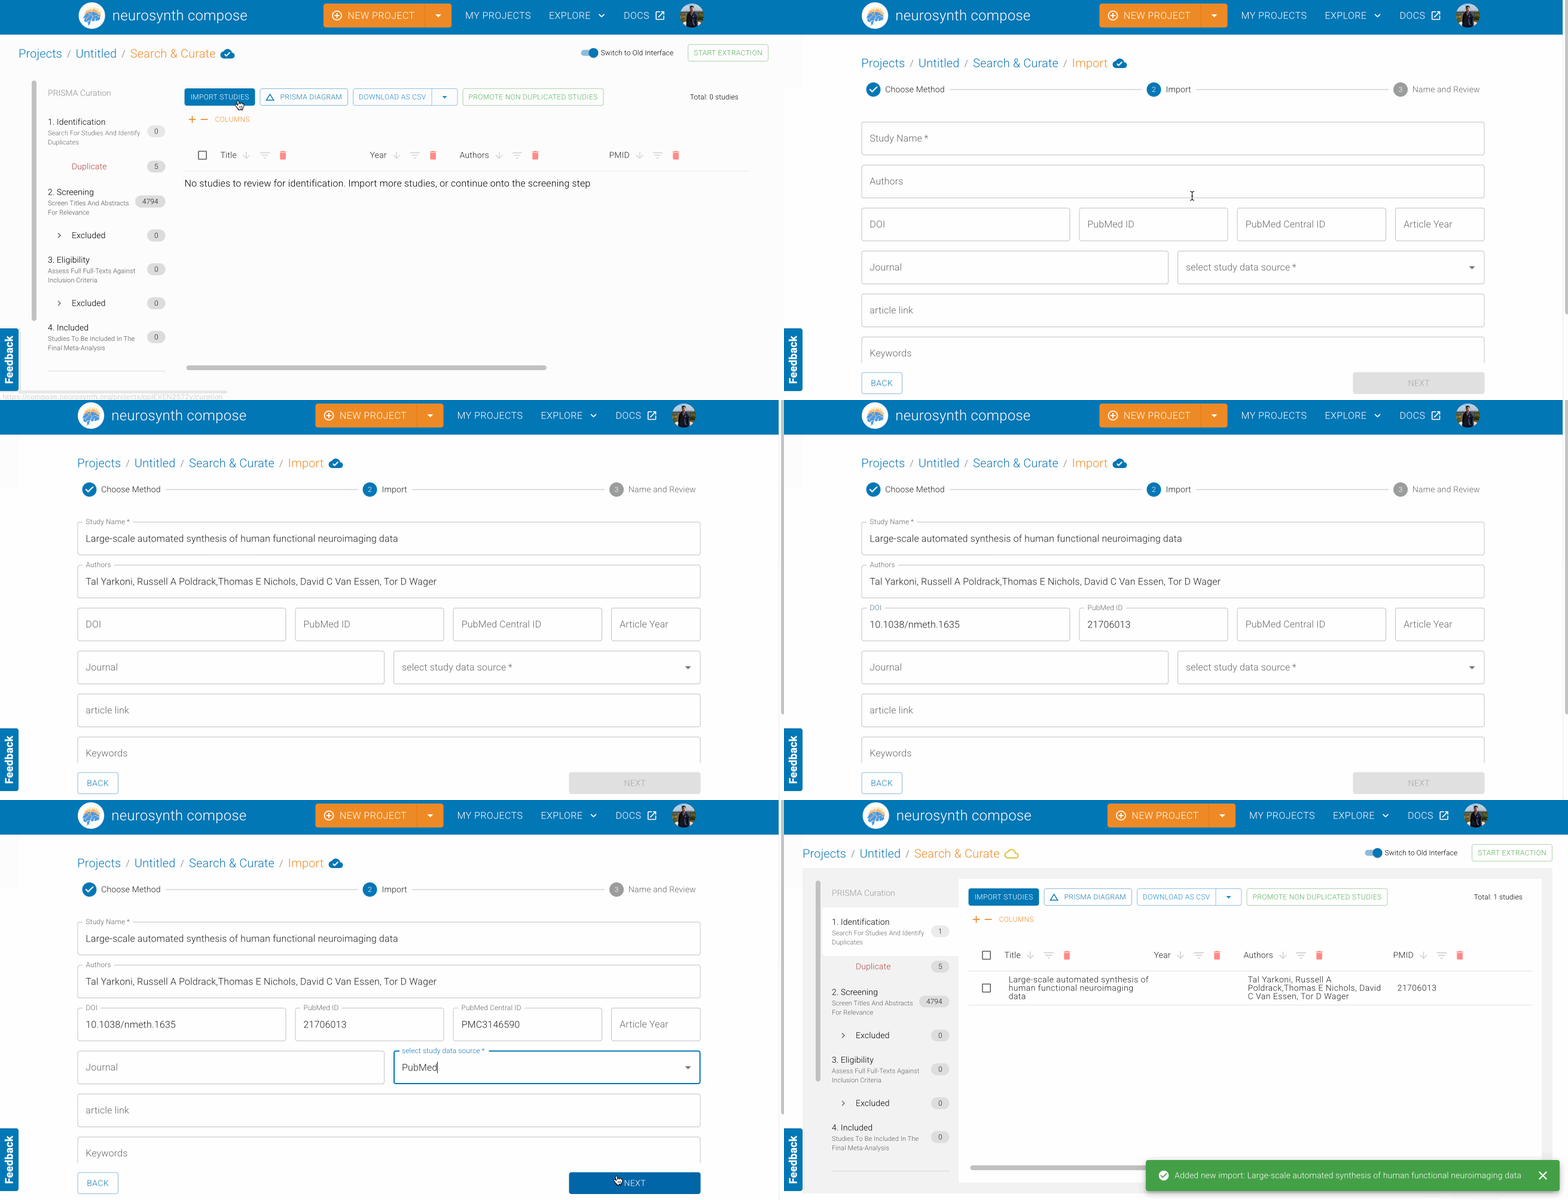
If there is any record that cannot be easily imported using one of the methods listed above, you can also manually create a study. This may be necessary to include resources like unpublished studies.
Sleuth files
At the moment, it's not possible to add studies from a sleuth file into an existing project. To create a new project from a sleuth file, read more here.
Duplicates
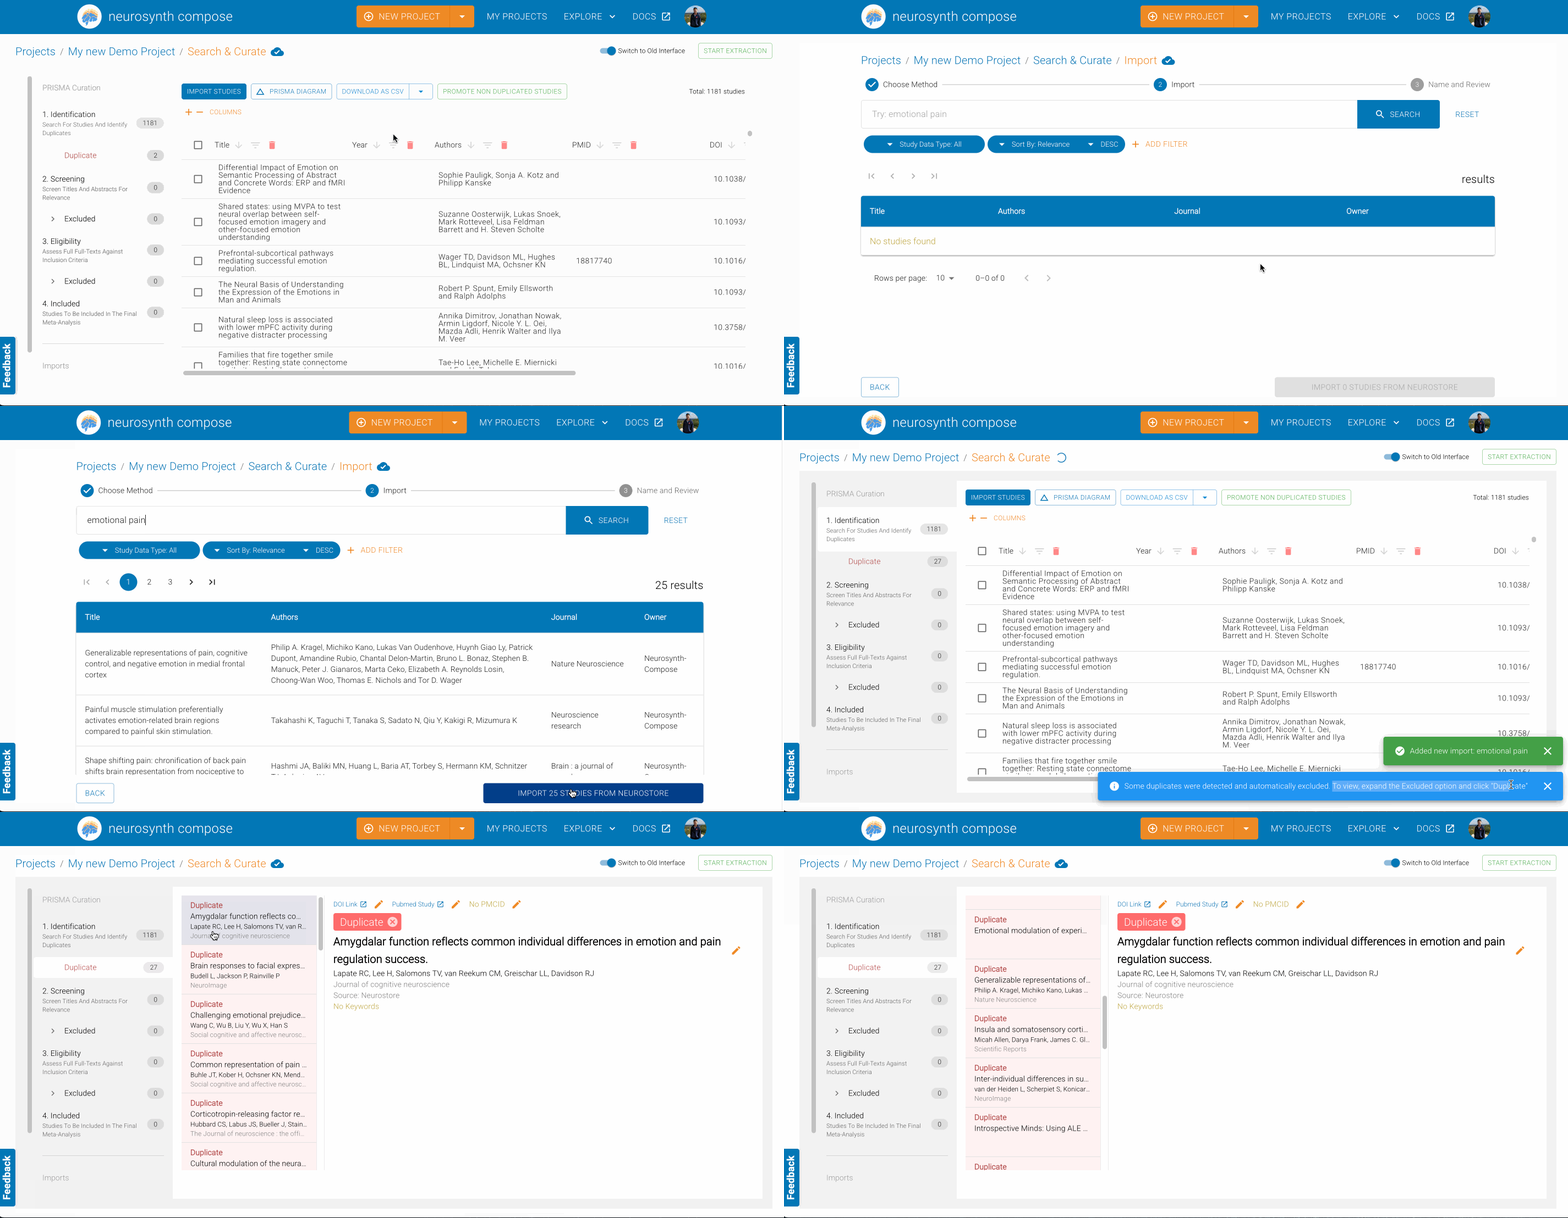
If duplicates are detected in your import, you will be asked how to reconcile them by choosing which of the studies to keep by choosing "KEEP THIS STUDY". Matching duplicates will be automatically marked for exclusion. Note that as a user, you can override any of these selections at any time, and choose which studies to keep or exclude.
Neurosynth Compose does not delete studies. If a study is marked as a duplicate, it is marked as excluded but it is not discarded to ensure complete provenance.
There are two potential ways that duplicates can occur:
Duplicates are detected between the studies being imported and the studies already in the project
If any study being important has the same title, PMID, or DOI is the same as one already in the project, you will be asked reconcile these duplicates.
Note that if you mark a study that is already promoted as a duplicate, it will be "demoted" back to the first column and marked as "duplicate". It is reccomended to mark as duplicate the incoming study to avoid this.
Duplicates are detected within the file you are importing
Although rare, it is possible to have duplicates within a given import. For example, if within a RIS file there are duplicate entries. In this case, you will be asked to select which study to keep. Studies marked as duplicates will still be imported but marked as excluded.
Excluding and Promoting Studies
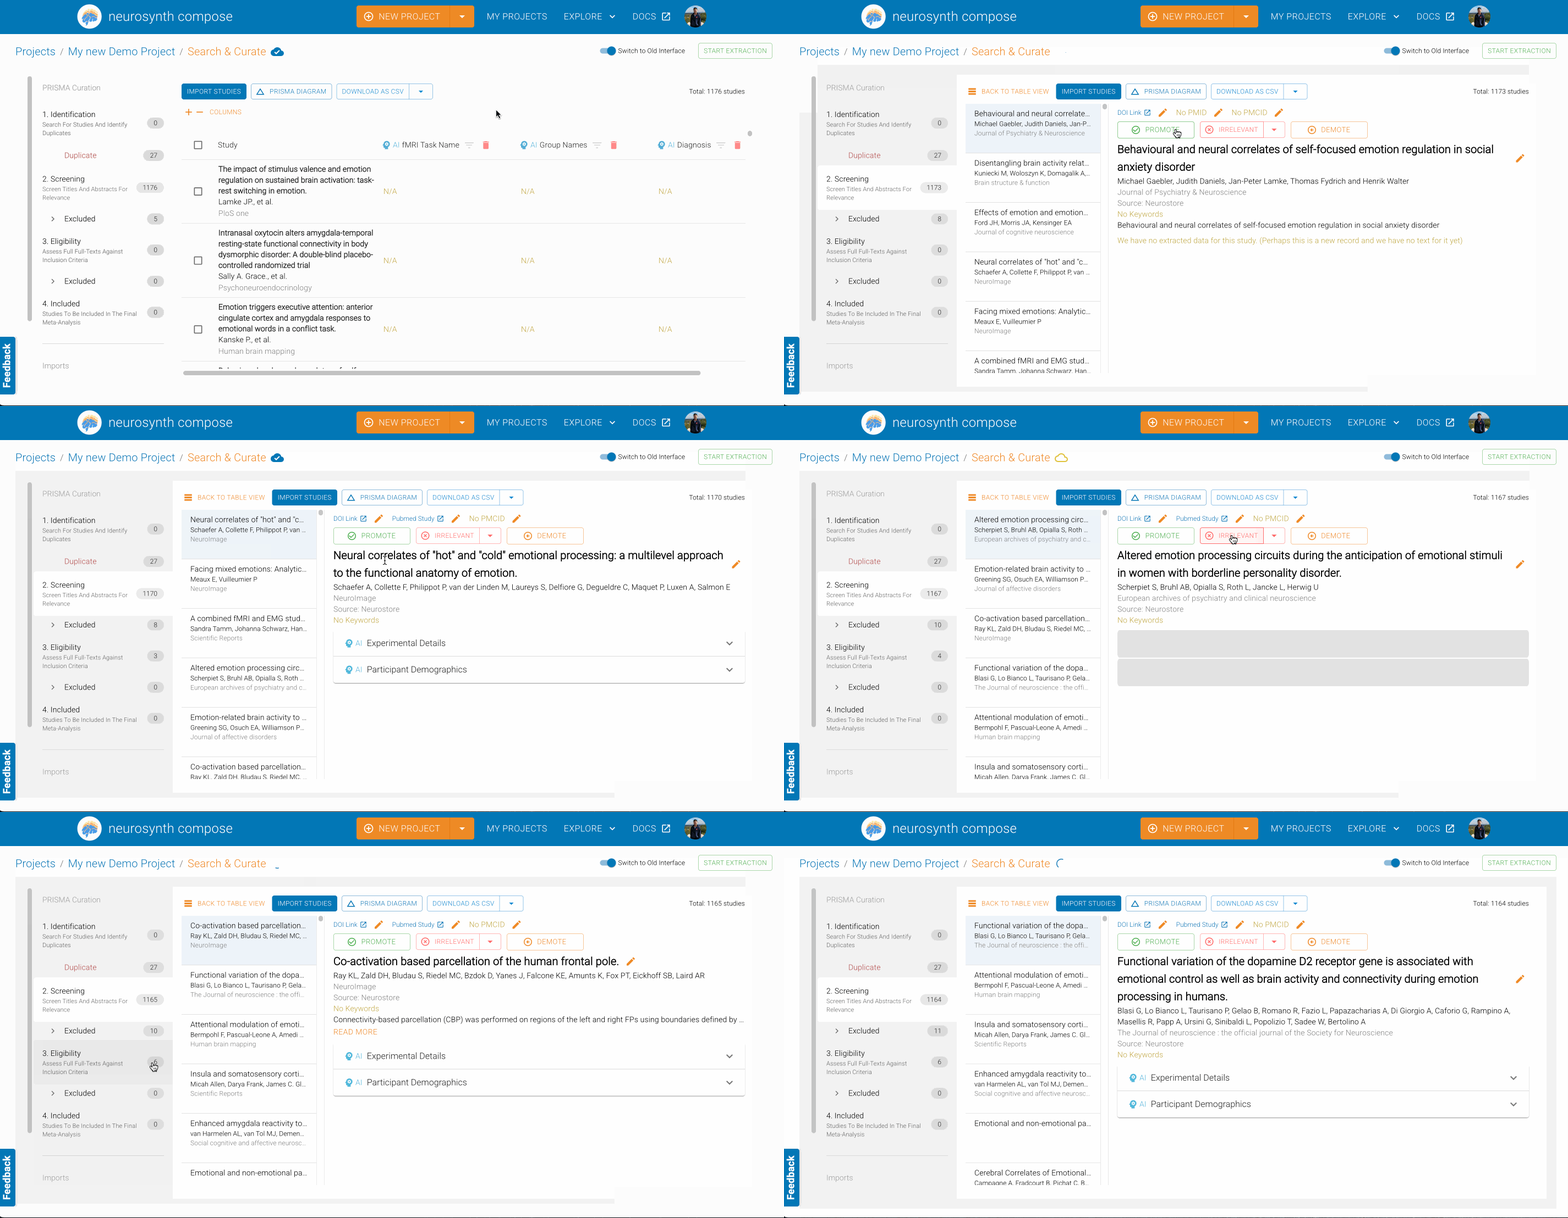
Once studies have been imported into the first column of the curation phase, they need to be reviewed for inclusion into your meta-analysis. All studies must be either excluded or moved to the inclusion column in order to progress to the extraction phase.
To begin, either click on the button at the top of the column or click on any study in the column. This will open up a page which will show the study along with the following options: PROMOTE, NEEDS REVIEW, and EXCLUDE. There is also a button to ADD TAGS which will assign an informational tag to the study. This informational tag is a tool that allows you to mark studies with certain information - once an informational tag is created, you can filter by those tags.
Exclude
To exclude a study, click the EXCLUDE button and select the exclusion reason. You can either choose from the preset exclusion reasons or you can begin typing to create a new one.
For the PRISMA workflow, the default exclusion reason wil depend on the phase you are in (identification vs screening vs eligibility), to match the PRISMA guidelines. While we do not recommend it, you can click the arrow button and start typing in the input to create a new exclusion reason. Revisit the PRISMA workflow to review reccomended exclusion criteria.
Promote
If a study meets inclusion critera (for the current phase), click PROMOTE to move the study forward to the next curation column. If it is moved into the right most inclusion column, then it will be included in the meta-analysis.
For the first column (especially in a PRISMA workflow) it can be tedious to promote non-duplicates to the next column. If all duplicates have been resolved, you can exit the dialog and click PROMOTE ALL UNCATEGORIZED STUDIES to advance all non-duplicate studies to the next column.
AI Extracted Features
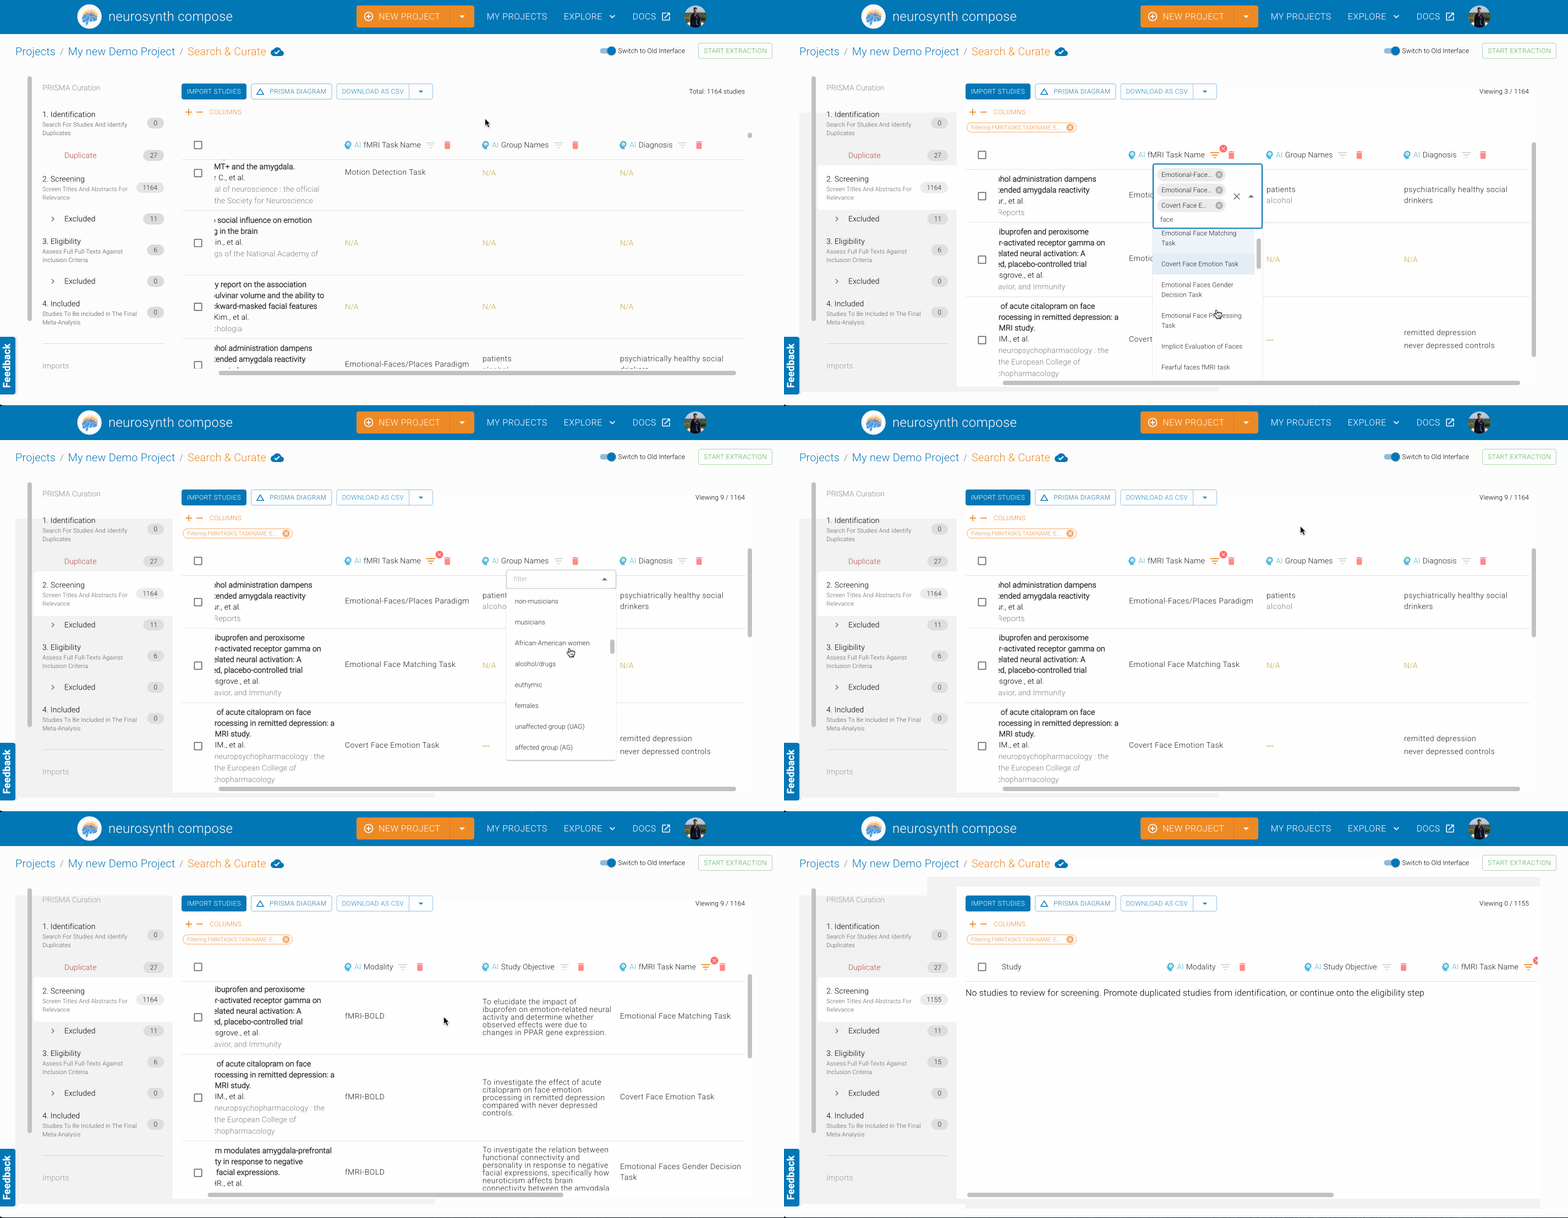
Using artificial intelligence, various task and participant metadata have been extracted from the paper's full text. To view these extracted features, click on the "+ - Columns" button and check the checkbox for any options under a group header with an AI Icon.
Task Details
count
Number of participants in this group
diagnosis
Diagnosis of the group, if any
group_name
Group name, healthy or patients
subgroup_name
Subgroup name
male_count
Number of male participants in this group
female_count
Number of female participants in this group
age_mean
Mean age of participants in this group
age_range
Age range of participants in this group, separated by a dash
age_minimum
Minimum age of participants in this group
age_maximum
Maximum age of participants in this group
age_median
Median age of participants in this group
imaging_sample
Whether this subgroup underwent fMRI, MRI or neuroimaging (yes or no)
Participant Demographics
Modality
Modality of the neuroimaging data
StudyObjective
A brief summary of the primary research question or objective of the study.
Exclude
Whether the study was primarily either a meta-analysis or a review. (Only studies that conduct primary data collection are to be included, exclude = true would indicate that the study in question was either a meta-analysis or a review)
fMRITasks
List of fMRI tasks performed by the subjects inside the scanner and their metadata. If the study did not include fMRI tasks, this field will be empty.
fMRITasks.TaskName
Name of the task, e.g., 'Stroop Task' or 'Go/No-Go Task'.
fMRITasks.Domain
The domain of the task, e.g., "Perception", "Attention", "Emotion" etc.
fMRITasks.Concepts
List of mental concepts associated with the task, such as cognitive processes or representations it engages. Examples include "working memory", "response", "inhibition", 'visual perception". The underlying mental constructs measured or manipulated by the task.
fMRITasks.Conditions
Conditions of task performed by the subjects.
fMRITasks.TaskMetrics
Key metrics or outcomes measured during the task, e.g., "response time", "accuracy", and "fMRI BOLD signal".
fMRITasks.TaskDescription
Description of the key features of the task, such as its purpose or what it measures.
fMRITasks.DesignDetails
A detailed description of the task design including information on the number of conditions, the number of trials per condition, the length of trials, and the length of inter-trial intervals.
fMRITasks.RestingState
Whether this task wa a resting state task or not
fMRITasks.RestingStateMetadata
Additional details about the resting-state task, such as duration and instructions provided to participants, if applicable
fMRITasks.TaskDesign
Design(s) of the task
fMRITasks.TaskDuration
Total duration of the task, e.g., '10 minutes' or '600 seconds'.
Downloading included studies
In order to download the studies that you have included in Curation, you can utilize our download feature. Go to curation and click "Download Included as CSV". Alternatively, you can click the dropdown and download the included studies in BibTeX format instead.
On to Extraction
When you have categorized all imported studies by either excluding them or moving them to the inclusion column, then you have successfully completed the curation portion of the meta-analysis.
Neurosynth Compose will detect this and reveal a new button: MOVE TO EXTRACTION PHASE. This will move you back to the project page and get you started on the next major component to building your meta-analysis: extraction.